I’m touring since June 2012 in New Zealand. Now I can see the pros and cons regards my equipment. I’ve changed a lot of things since the beginning and I’m quite satisfied today even if I would like to be even lighter. I want to be as independent as I can. I can fixed myself common bike issues, I cook, I recharge my electronic devices while cycling, and I sleep anywhere for free. This is equipment is ready for four seasons, normally… :-). Let’s have a look!
Riding
First bike
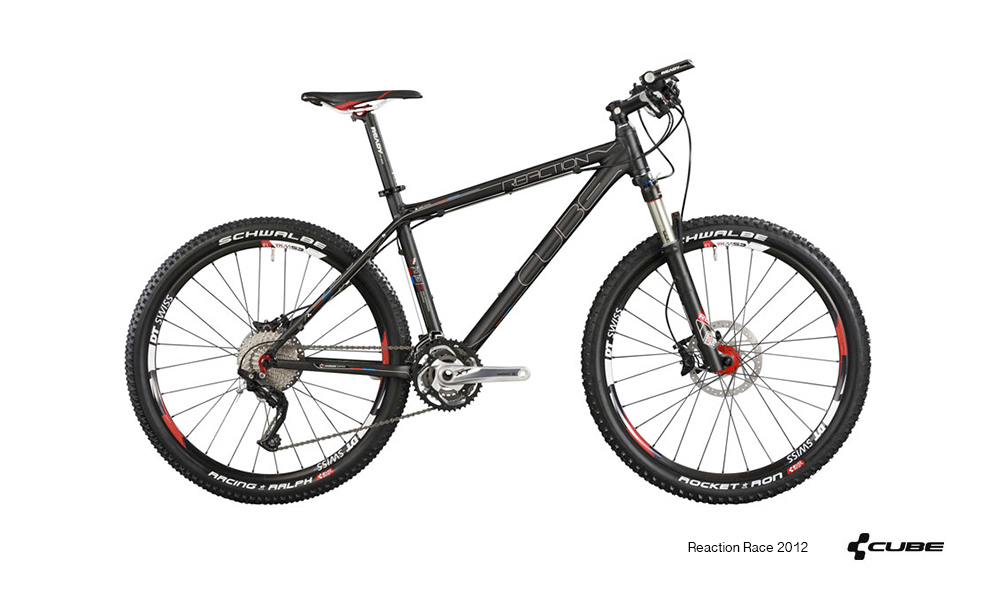
After several weeks of research, this is the bike I’ve chose. I did not want a special touring bike as I planned to some mountain biking once a while. This mountain bike remains a mountain bike once the trailer is dismounted. That way, my setup is more flexible. I kept this bike 2 years and a half. During that period of time I spent about 1500NZD on maintenance (5 chains, 3 cassettes, 2 sets of chain rings, oil).
Cost: 1300€ / Weight: 11kg
Pros
- Light bicycle (11kg, frame size: M)
- Strong frame
- Discs brakes
- Front suspension
Cons
- Fragile 10s chain (up to 3000km)
- Position (not that bad actually)
- Hydraulic discs brakes (if problem, hard to fix. But I love the smoothness)
Second bike

I was very lucky! I did work in Sydney as a web designer and was able to save lots a money. That way I decided to offer myself a nice treat :-) First, I’ve discovered the Rohloff Speedhub in a bicycle shop. Then I did some research online and also discovered the Carbon Drive Belt system. In fact, I could not fit those two new pieces on my actual bike so I decided to look for another one. I made lots, and lots of research and found this beauty : The Budnitz MTN. It’s nearly all titanium! The rear hub protect all the gears. The belt is silent and works in any circumstances. Titanium is beautiful and does not rust. I’ve hesitated a long time before ordering it but then thought about my trip. This is my transportation, I will use this bike every single day. Let’s buy it!
I’ve been cycling 6000km from Sydney to Singapore and I never had to replace any part. In few years time this bike will be cheaper than a “classic” mountain bike and the frame will look always like new! Just the best bike I’ve ever had :-)
Cost: 7000USD / weight: 12kg
Pros
- still Light bicycle (12kg, frame size: L)
- Strong frame
- Wonderful design
- Discs brakes
- Front suspension
- internal cable
- Deadly silent
- No oil needed
- Strong belt (up to more than 30.000km!)
- sealed gear
- Maintenance free
Cons
- Position (not that bad actually)
- Hydraulic discs brakes (if problem, hard to fix. But I love the smoothness)
- non common wheel size (650b) but I can always order tyres online and pick it up along the way.
Trailer
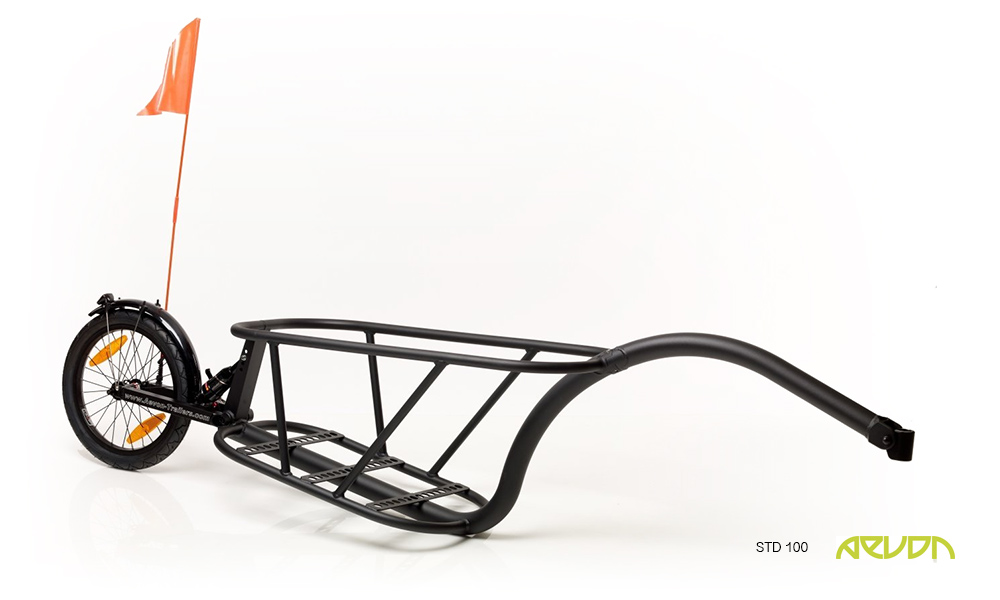
My second favourite piece, the Aevon Trailer STD100. It’s really stable (better than a trailer with the fixation to the axle of the rear wheel). The suspension is for me important because it improves the general safety and allows me to ride on any kind of road or rocky path. For example, the Bob Yak trailer (the one without suspension) doesn’t allow you to go faster than 40km/h. If you do so, you will be in real trouble… If the Aevon trailer is too expensive for you, I would go for the Bob Abex model which has a suspension too. You can carry up to 35Kg on the road and 25Kg on mountain bike tracks. Some tests have been made carrying 100 litres of water and the trailer did handle it nicely.
I also prefer a trailer than panniers because the weight is not only on the bike. That way, the bike can be a lighter version. When I want to have some fun on bike trails, I just have to leave the trailer somewhere and I’m free! I’ve got a real mountain bike under my feet. That’s great :-)
Cost: 590€ / Weight: 7kg
Pros
- Super strong
- Allows mountain biking (with 25kg)
- You do forget it very easily
- Very stable (due to the suspension)
- Used as a bike stand
- The bike doesn’t carry all the weight
- The main cage protects very well your stuff during flights
Cons
- A bit heavier than racks + panniers
- Takes more space
- Need to carry a bit more tools
Saddle
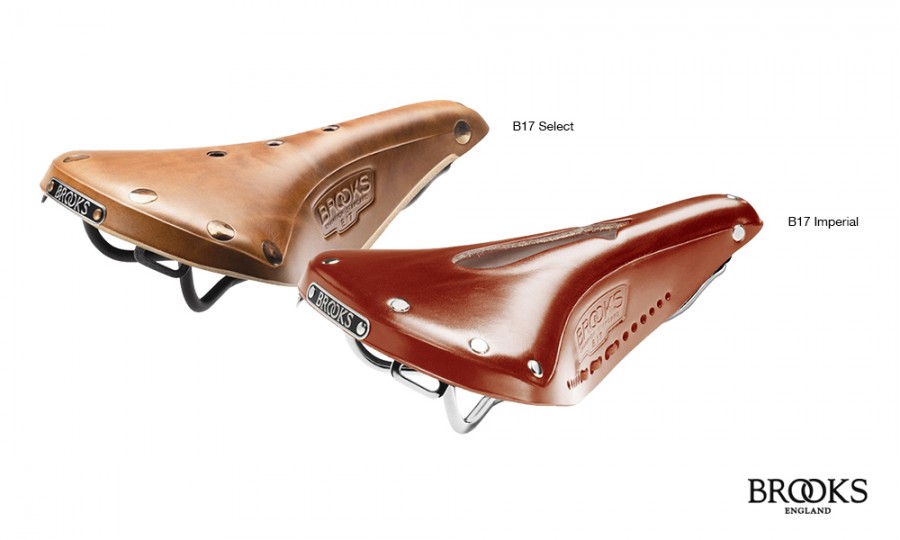
I’ve started touring with the original MTB saddle and I must say it was painful. The first 30km was ok after a while but the rest of the day… This is only when I got to Alexandria (more than the half of my trip in New Zealand) that I decided to get a Brooks saddle. I had two since.
The first one was the B17 Select. It was great at the beginning but I think I did not care of it enough and then the shape became painful again. This is why I changed (after two years and a half) and got the B17 Imperial with the hole in the center expecting that would solve the “pain in the ass” problem. Actually, it’s only slightly better, nothing miraculous.
B17 Select, cost : 135€ / weight : 540g
B17 imperial, cost : 140€ / weight : 530g
(Both model have Proofide and rain cover)
GPS
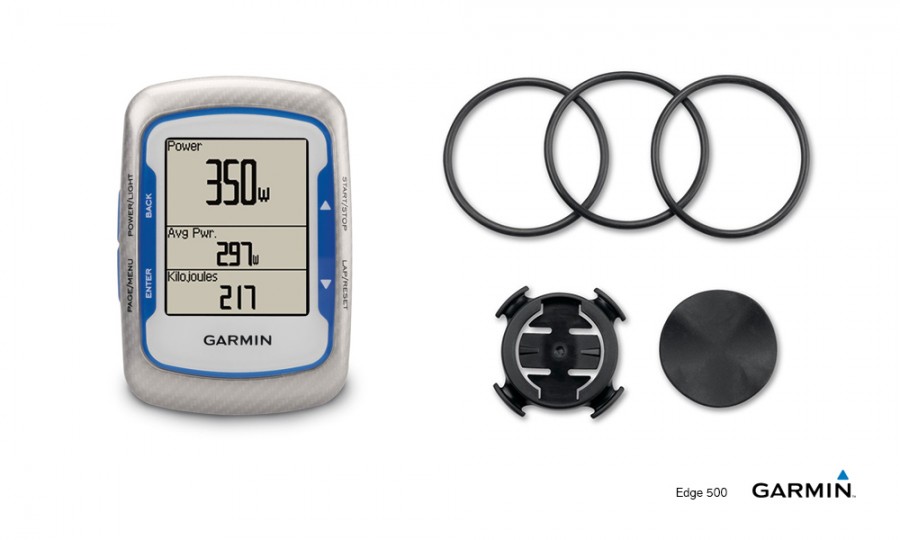
The tracking computer. I like being able to see the altitude and the temperature. Then I use those data to track my daily route and export a map. The battery of the Garmin Edge 500 last 4 days which is a bit short. The biggest weakness for me is the fact I cannot charge it and use it at the same time. Another annoying thing is if I have to charge it during the day then it split my trip in two parts. Why? An option would be good. The altitude is not really precise too. If I turn it off and on again, it shows a different value… Well, at least, it tracks correctly excepted for the last few months in Indonesia where it completely broke. I had to send it for repair once in Malaysia…
Cost: 160€ / Weight : 57g
Mirror
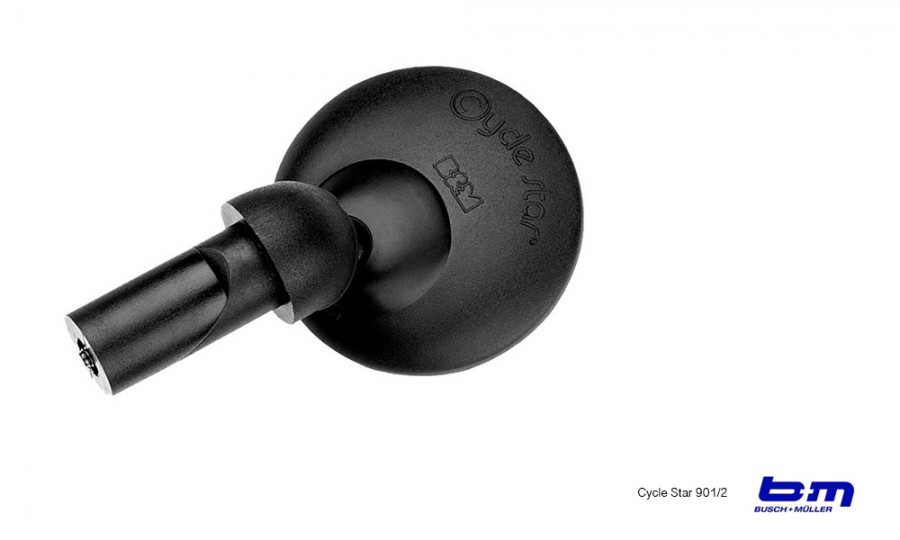
A very important piece! This mirror called Cycle star 901/2 is the most compact one I found online. It’s a bit expensive for just a piece of plastic but I did not find any other company who produce this kind of product. It’s lightweight too and the view angle is just right. Perfect for me :-)
Cost : 25€ / Weight : light :-)
Fixing
Tools
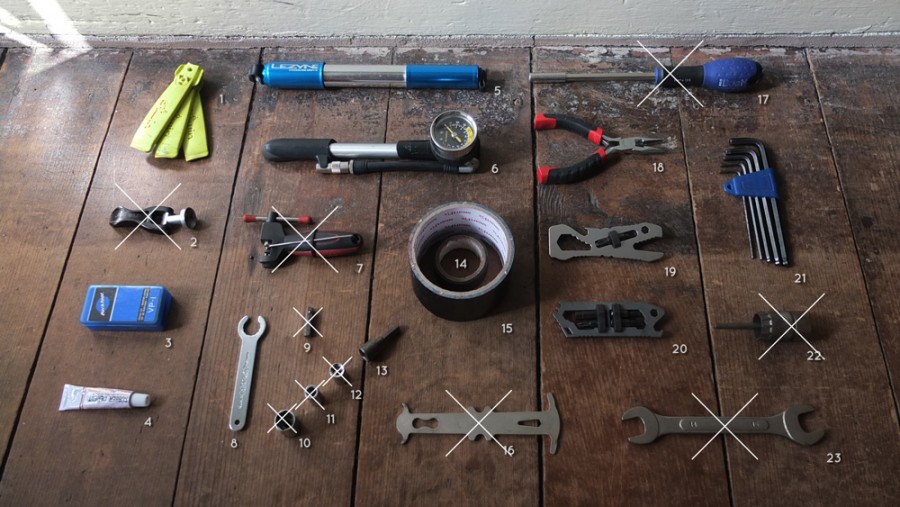
This is all the tools I used to carry when I had my first bike. Now I’ve got a Rohloff paired with the carbon belt drive I don’t need that much tools as Budnitz offers a modified version of the Topeak Ratchet Rocket lite :-)
- Tire levers (x3)
Key for Quick-Release Wheel Locks (70g)- Patches
- Glue
- Compact Lezyne Pressure Pump (102g)
- Topeak Pocket Shock DXG Pump (170g)
Chain tool (~90g)- Brooks tensioning tool
- Bit adaptor (square to hex)
SocketSocketSocket- Socket
- Electrical tape (my favourite ever!)
- Duck tape (very useful as well)
Chain tool wear indicator (very important for 10 speeds chain)Socket screwdriver- Small plier
- Leatherman pocket tool – Piranha Tool (54g). Everytime I try to use it, it doesn’t fit or it’s too small or I don’t have enough space to turn… Useless for a modern mountain bike.
- Leatherman pocket tool – Mako Ti (Used especially for the spokes.)
- Allen keys (often used)
Free Wheel removal tool (used once in a year)Spanner (that big, just for dismount the pedal in the airport…)
Tools when packed
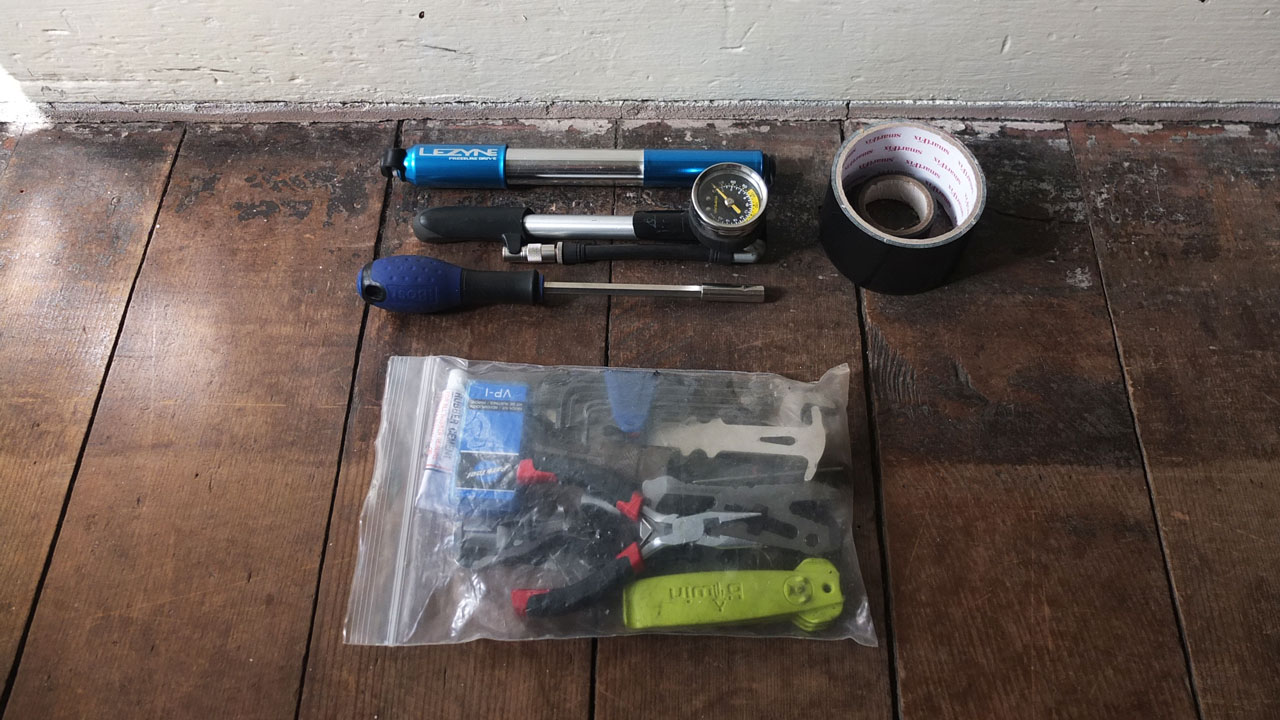
When everything it’s packed it does not take that much place and I have more than enough tools I guess.
Toolset
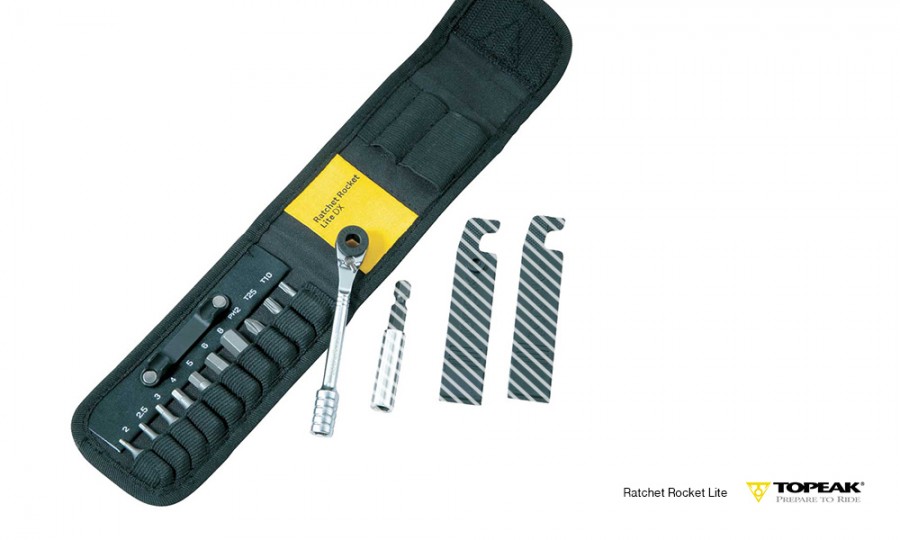
This is the toolset that came with the second bike I bought. Budnitz modified the kit to match the screws used on it. The allen key n°2 and Torx n°10 was replaced by special keys as I chose to have the “total lockdown” option. That means I can dismount all my bike with that small “pocket” of tool. The wrench is surprisingly very strong compared to its size. I’ve been pushing on it very hard and it always works like a charm. I’m very happy with it :-)
Note: The two tire levers and the extension are part of the DX version so I don’t have them.
Cleaning!
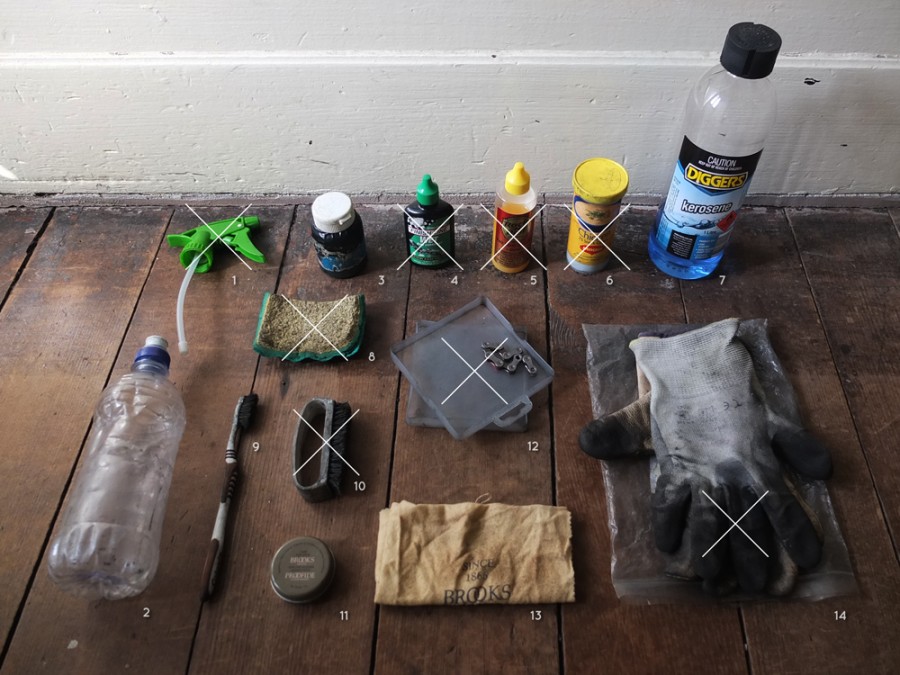
Same for my cleaning stuff. I don’t have to use oil anymore. No gloves because a belt is not that dirty. The plastic box to clean my chain is now a souvenir. I used to use the spray has a “high pressure” water hose to get rid of the grease of the chain after using Kerosene to clean it.
Spray cap. I use this one with my drinking bottle when I clean my drive train. Mainly the goal is to use water pressure after I applied the kerosene. I clean my chain every two weeks maximum.- Drinking bottle, strong, light and multi-purpose as seen above.
- Thick grease used for the connector between the bike and the trailer.
- Thick oil used for the fork and also the chain when it’s raining.
Rock n’ Roll “Gold” lube used for the chain. This is a very good one for dry weather.Container for kerosene used with toothbrush when I clean the chain.- Kerosene used for cooking and cleaning the drive train.
Sponge used for cleaning tent, bags and bike.- Tooth brush for the
chainbelt. brush for bigger area than the chain.- Proofide to protect the brooks saddle.
Sram Chainbox. I looked for many ideas to clean my chain with the minimum of effortand product and finally found this solution.- Brooks cloth.
Gloves found along the road (always).
Spare pieces
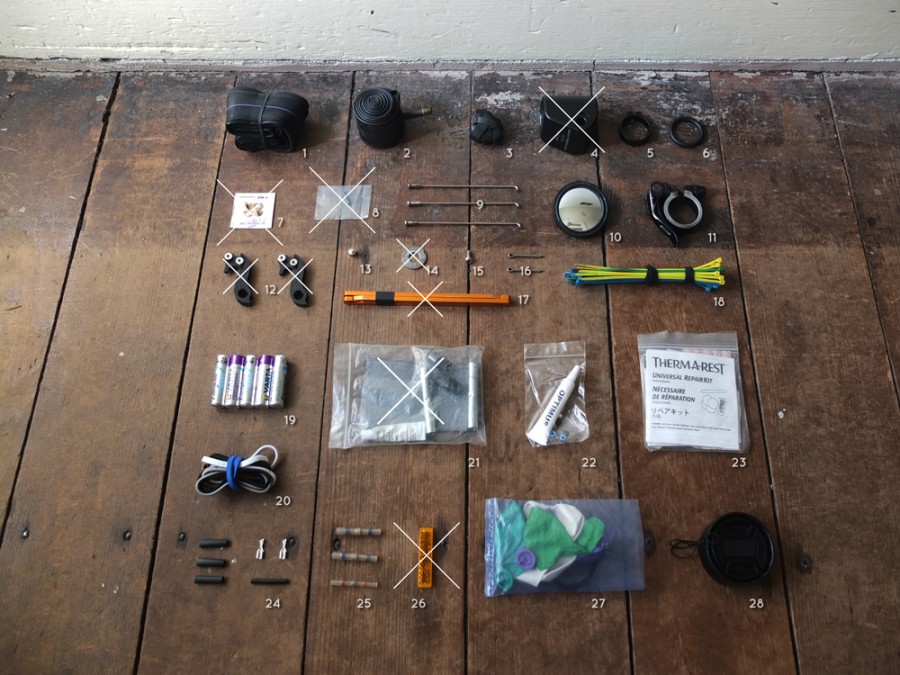
This is all the small bits I carry in case something break along the way. With my new bike there is stuff I did not need as well which is great.
- Inner tube
26″27.5″. - Inner tube 16″.
- Old inner tube sliced (I used those pieces for my tent or to hold parts together or anything else).
Spare trailer hitch. The actual one is done so I bough a new one recently.Spare Ring used above the trailer hitch.Spare rubber ring used below the hitch to prevent the damage of the seat clamp.Quick release chain link.Shimano chain link.- Trailer’s wheel spokes.
- Mirror.
Old seat clamp.Derailleur hanger.- Valve cap.
- Washer (found on the road).
- Screw (don’t know why).
Disk pad security bits that I don’t need…- Aluminium tent pegs.
- Zipties.
- Lithium batteries for my torch.
- Repair kit for tent.
- Lube for Katadyn water filter.
- Repair kit for mattrees.
- Some more elastics.
- Cables connectors for the Hub Dynamo.
- Cable connectors.
Pedal reflector.- Balloons.
- Camera lens hood.
Packing
Waterproof Bags
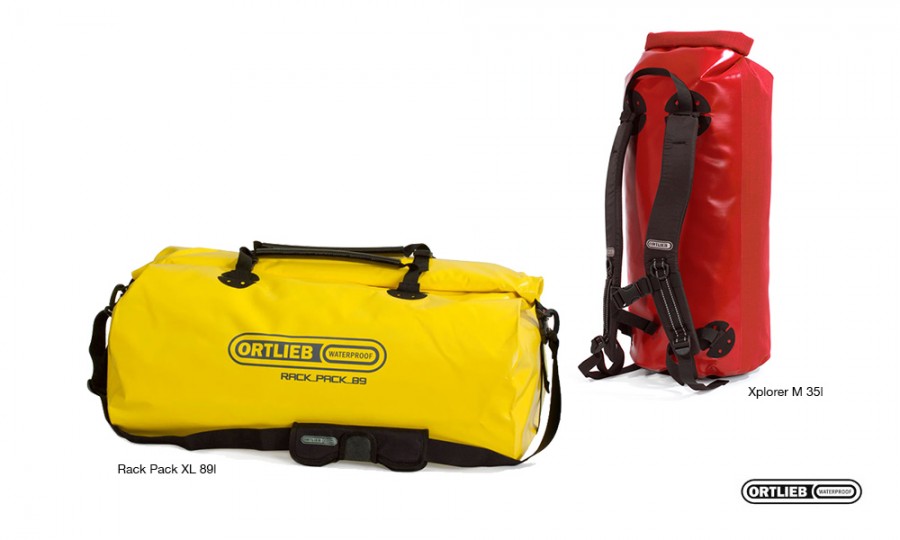
Tough, waterproof and big enough to contain all my stuff. I’ve started travelling with Yellow back (Rack Pack XL) and a classic backpack which was a bit more than 3kgs. Because I did not used it often I’ve swapped it with the Ortlieb Xplorer (the M model). Since then I still have it :-). It’s not really comfortable when full but I don’t hike that often. The only problem I have found on those bag is after a while, and because of using it everyday, the part that is rolled has some tiny holes. I’ve tried to use some tape but did fixed them for a short period only. When it’s heavily raining, only few drops enter in the bag so that’s ok.
Rackpack, cost : 79€ / weight : 1190g
Xplorer, cost : 61€ / weight : 640g
Powering
Dynamos
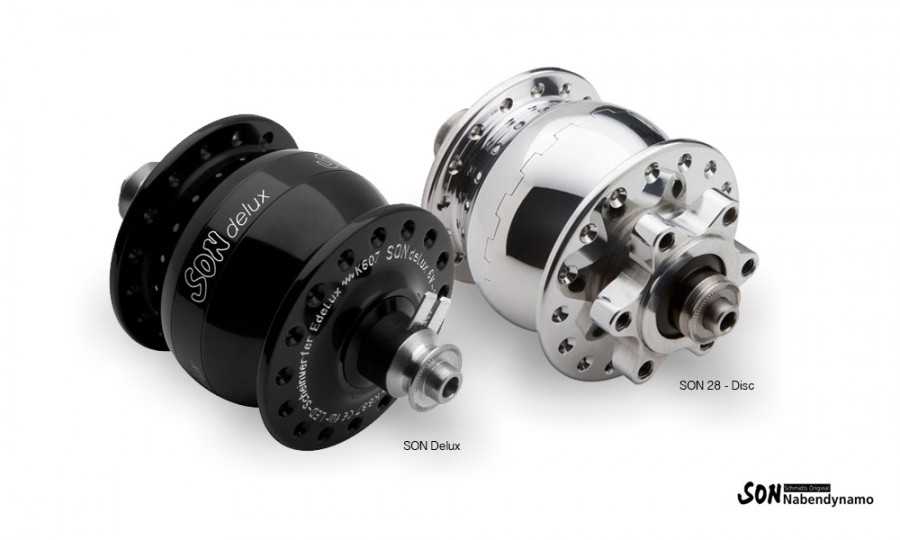
My electricity! The SON Delux dynamo or SON 28 doesn’t create any drag at all in use. Associated to the E-Werk + the buffer battery, I can charge anything using a usb connector. The only thing I can’t charge is my laptop but it last 12 hours so that’s ok. I used to have only one that I mounted on my trailer. Since I’ve got my new bike, I have a second one at the front wheel. That’s great because I can still charging while I’m using the front light. There is no drag at all. These one are expensive but very good. Just be really careful with the two connectors, this is the weakness. Unluckily, I forgot once to tight the rope around my bags and when I started cycling it felt and wrapped up itself around the axle which damaged those connectors. I had to change the hub.
By the way, the Nabendynamo team is really helpfull! I sent them the hub and they fixed it!
SON Delux, cost : 199€ / weight : 390g
SON 28 with disc mount, cost: 229€ / weight : 460g
E-Werk charger
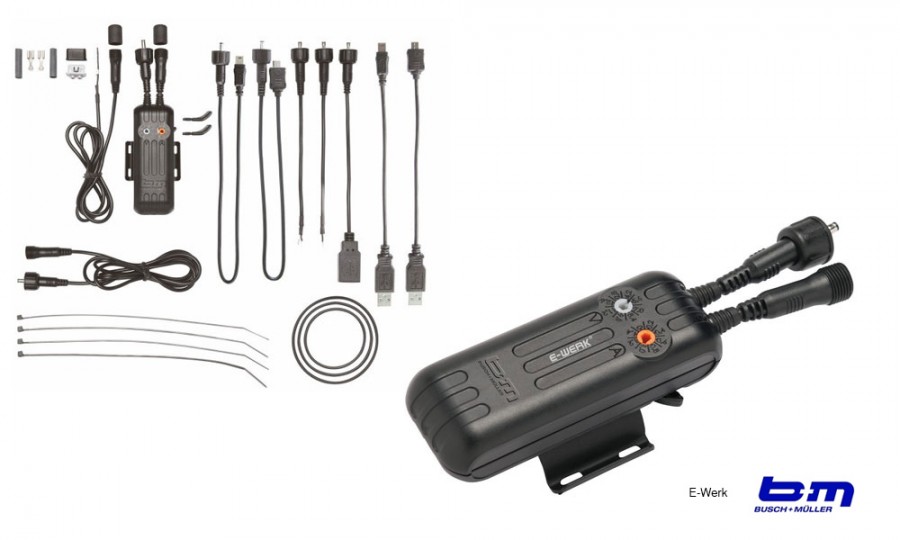
The E-Werk is connected to my rear SON delux dynamo. Then goes to the buffer battery (not shown here). From the buffer battery I’ve got a female USB connector on which I can plug all my stuff like GPS, Shaver, Lights, Phone, Kobo, camera’s batteries.
Cost : 136€ (with buffer battery) / Weight : 233g
Front light
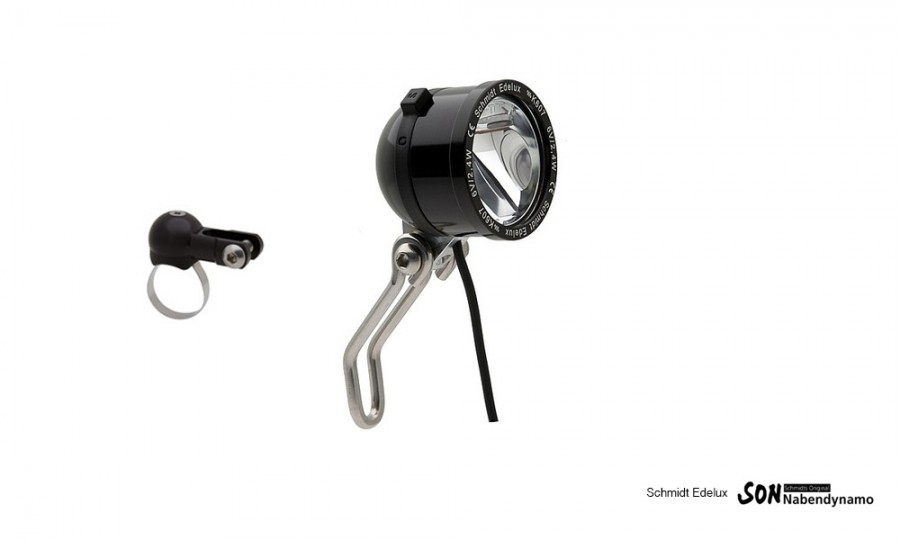
The Schmidt Edelux (first version) is connected directly to the front dynamo. This light is powerful. I can ride at night without any issue. Nabendynamo released the Schmidt Edelux II which has the same design but has 30% more brightness.
Cost: 160€ (including support 25€) / weight : 173g
USB lights
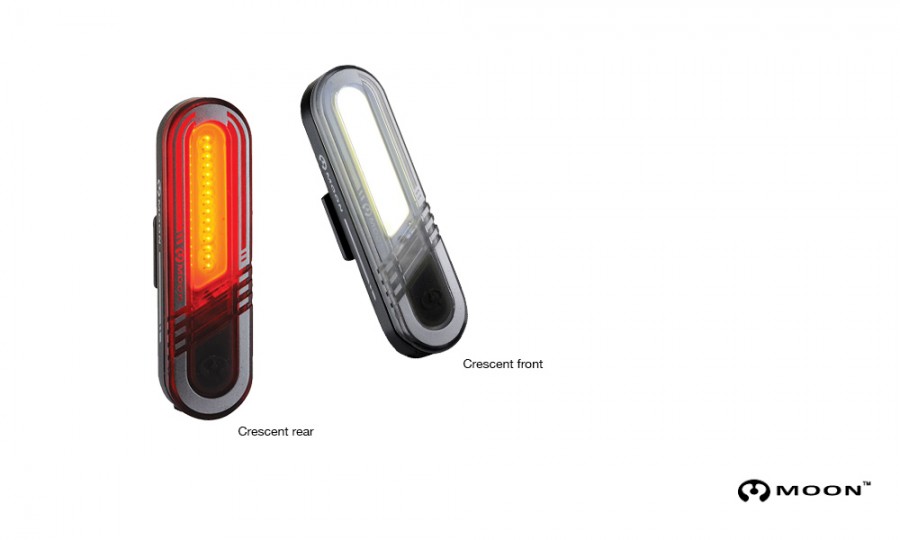
These Moon Led lights are lite, powerful , rainproof and rechargeable by USB. What more to say… I could have buy only the rear one but I like to have a backup incase my front light would stop working.
Cost : 39$AUD each / weight : 85g
Camping
Tent
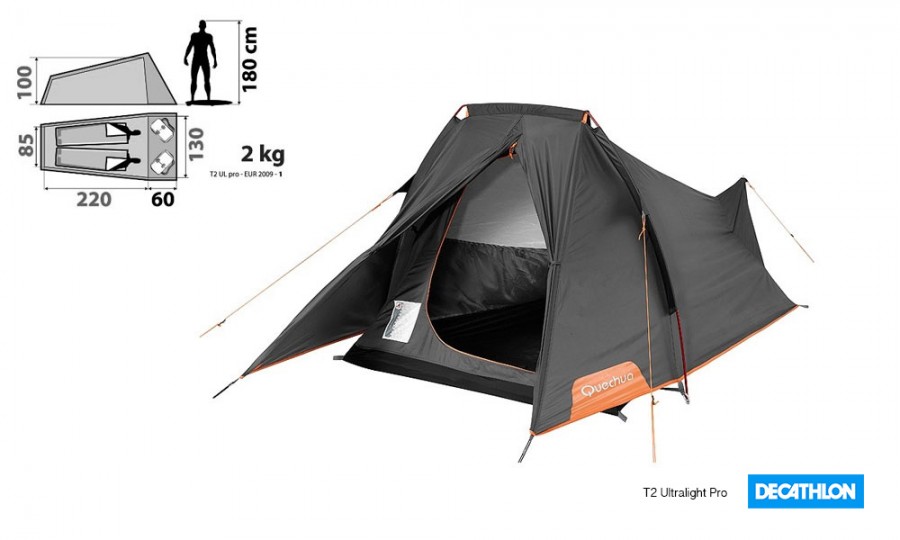
This tent from Decathlon is easy to set up (5 to 10 min max) and the inside moves with the outside protection. If the elastic broke, replace it with the same length as it keeps the tent balanced when it’s set up. ,it weighs 1.5kg which is honest for a 2 place tent. I had this tent for 3 years and then changed it for a hammock with tarp. The next time I will buy a tent I will protect it straight away with an UV + waterproof spray. If I have done this with this one, I would have kept it longer. The mistake I’ve made was when I was working in NZ. I let the tent under the sun for weeks which damaged the textile of the tent. Since then the waterproof became inefficient. I won’t make that mistake twice!
Cost: 109€ / Weight: 2Kg
Hammock
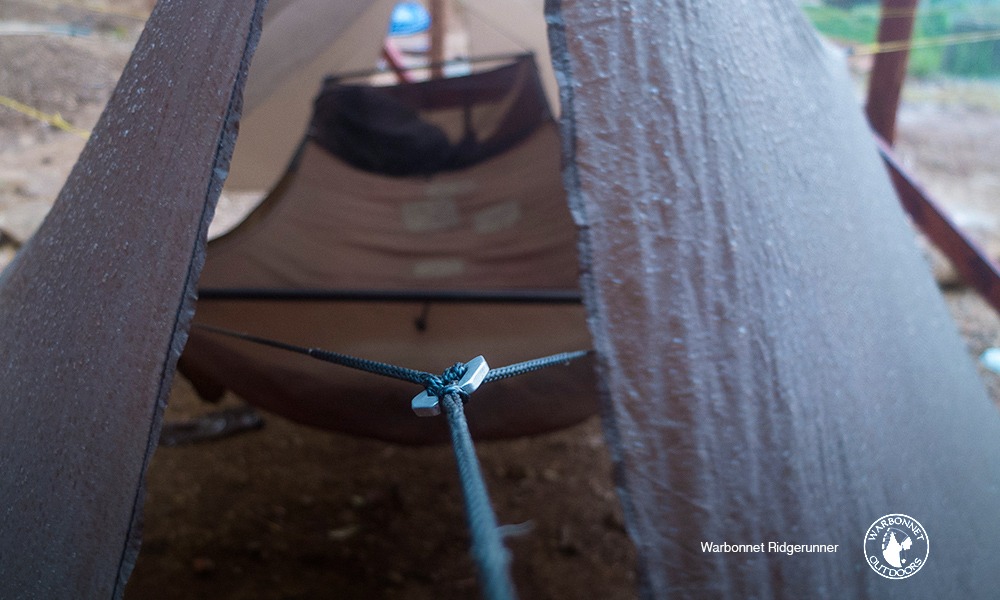
I’ve been using the Warbonnet hammock Ridgerunner since Bali and I must say, it’s very comfortable. I’ve searched online for weeks before I’ve decided to go with this model. You might think it’s expensive be the build quality, the weight, the comfort are all those things who make this hammock perfect :-). The plus compared to a tent is that you can sleep with the same comfort every night. And if you don’t find trees, you can set ip up on the ground using a foot print. This set up is very flexible.
Cost: $225USD / Weight: 716g (Whoopies option. Including two carabiners 10$ / 50g)
Tarp
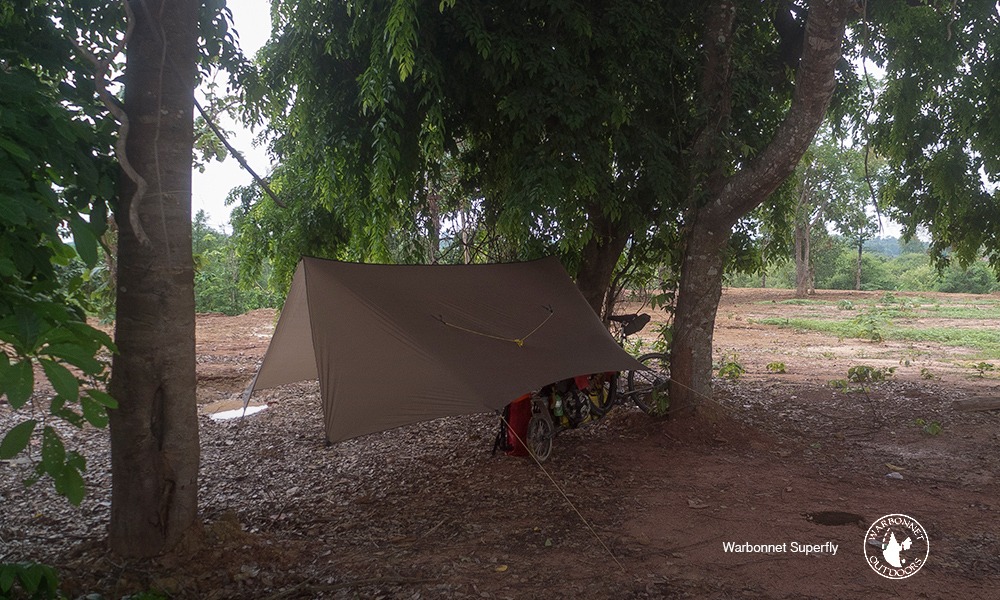
With the hammock I’ve been using their Warbonnet Superfly Tarp which naturally works well with the hammock. It’s a lot longer to set up compared to the hammock but with a bit of practice it becomes faster. The advantage compared to a tent is that in hot countries, the air flows better. Having things separated is another good thing because if on piece has a problem you can change it independently.
Cost: $160USD / Weight: 539g (including Tarp guideline $20USD)
Mattress
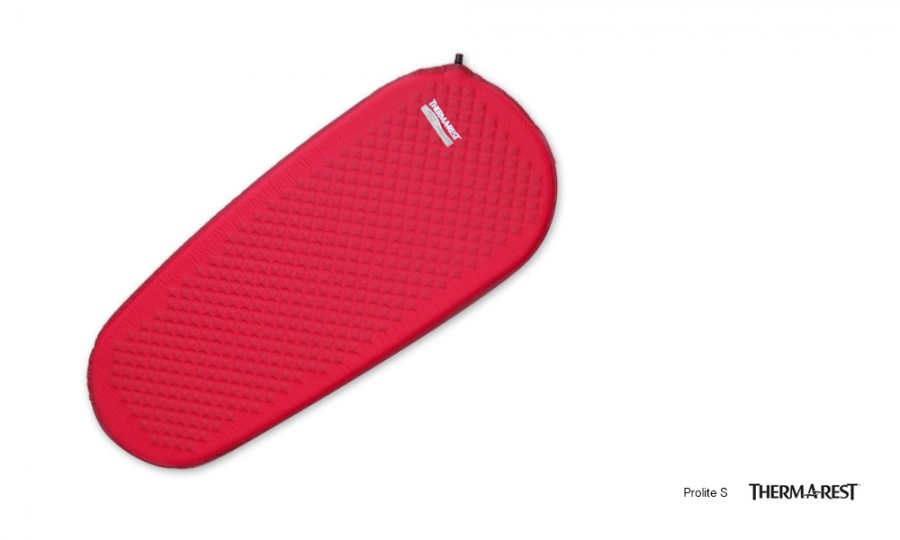
I’ve started with a Decathlon mattrees (full length 30€) but 6 months later I made two holes in it (on the top part… I don’t know how I did that…). I looked online for the best mattrees and discovered the Thermarest Prolite S. Fortunately there was a good camping shop in New Zealand (Napier) where I could buy one but the price was 3 time more expensive than in France! What?! Well, it was super lite and much small than the one I had before so I took it… This is one a 3/4 model and I still have it after nearly 3 years now (Singapore).
Cost: 210$NZD / Weight: 335g
Sleeping Bag

This is not exactly the model I purchased 3 years ago. Decathlon changed the color and the design but it has the same properties as mine. It works until 5°C and it’s quite compact. I’ve hesitated to buy a down sleeping bag but every test I’ve read, customers said that they lost downs. And when it gets wet, it lost its heat property. I’ve got this one since the beginning of my trip and it does perfectly its job, no complains.
Cost : ~50€ / Weight : 1.2Kg
Torch light
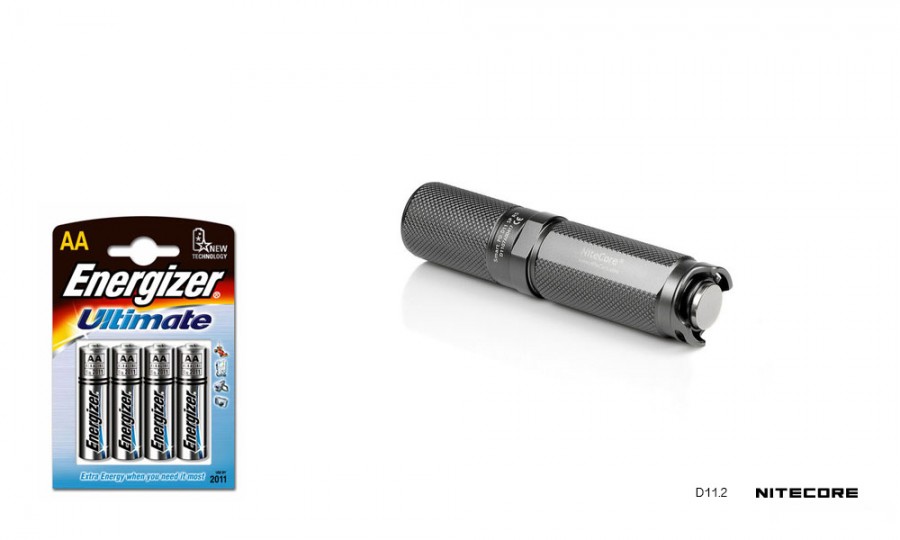
This Led torch Nitecore D11.2 is waterproof, lightweight and it needs only one battery (AA). It works better with Lithium battery but Alkaline could be ok just in case. It last 100 hours at the minimum brightness and few hours at its maximum. I think I’ve used about 1 battery every 3 months, maybe more.
Cost: 73€ / Weight : 46g
Cooking
First stove
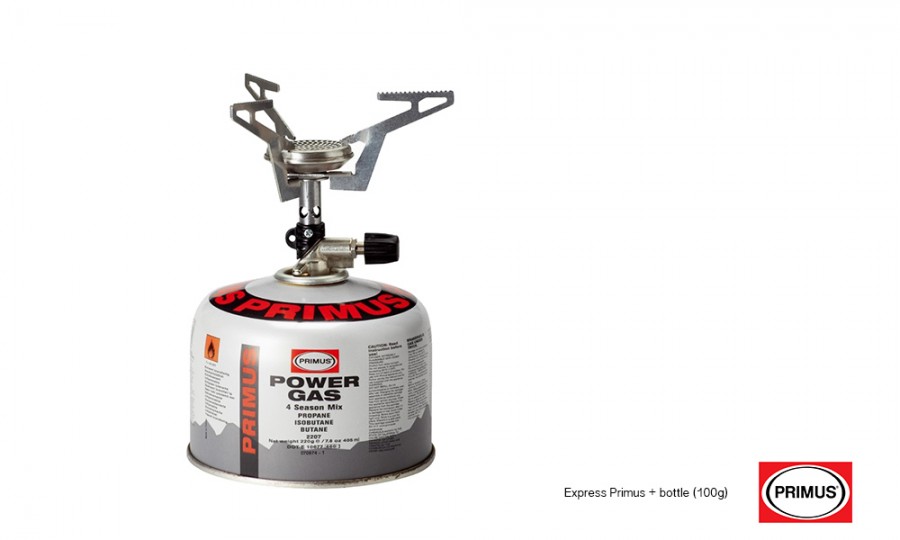
I’ve started travelling with this gas stove which was very compact and light but I realised quickly that cartridge bottles can be expensive especially in NZ. In average I would spend 20$ per months. I realised too that a “screw on” bottle is more expensive around (10$NZD) than a pierce model (around 4$NZD). I’ve used this stove for 9 months in NZ and then changed it for the one below. The advantage of gas is that it works straight away compare to the second model I have now that I must pre-heat. But when you get use to it, it take a minute or two max.
Cost : 30€ (without bottle) / Weight : 82g
Second stove

This is my second and actual stove, the Optimus Nova +. I can put any fuel in it. I use primarily kerosene which is the cleanest fuel to burn. You can find it in any supermarkets (Indonesia doesn’t have but you don’t need cooking, food is so cheap). It cost around 5$AUD for 1l bottle of Kerosene which last about one month. If I cannot find any kerosene, I just go to a petrol station and buy one liter for a dollar. Another advantage is it’s works on high altitudes. I never know if one day I will be cycle up high in the mountains :-)
Cost : 170€ (with bottle) / Weight : 430g
Pot
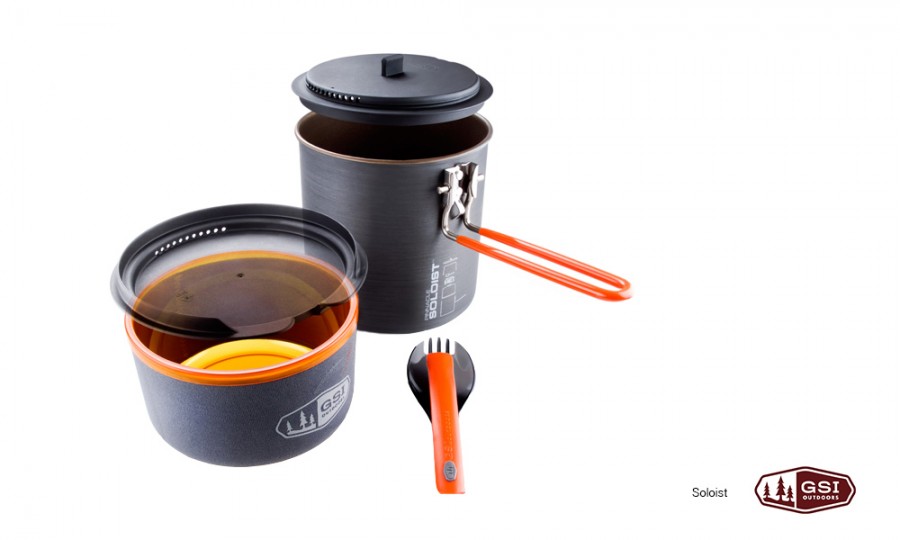
I bought a rectangle pot before I left paris and it did last a year and a half. Then it became really sticky. I had to get rid of it unfortunately and looked for something more durable. THis is how I finally bought this compact and lightweight pot. I’ve just replace the spoon/fork by chopsticks. The spoon last 2 weeks before I broke it anyway (I knew that). I’ve been using this pot since then and it still works perfectly too. I like buying quality stuff even if it’s a bit more expensive. That way, I limit waste.
Cost : 57€ / Weight : 309g
Cooking!

Another really important part is to eat healthy and hot (when needed). This is why I’ve started with a gas stove and ended with a fuel stove. I still have both (in case). The gas one is easier when it’s raining and I have to cook in my tent. The fuel stove is powerful and work everywhere. I’m using Kerosene all the time because it’s the cleanest fuel but I could use any from a petrol station which is handy. And it’s working in high altitudes as well so I’m ready to cook everywhere!
- My pot is a solo one but big enough to cook two meal. That way I cook lunch and dinner in one shot to economise energy and time.
- The knife is one of the most useful tool I’ve ever carried and I won’t be the only one to say that this is the first thing you need to buy for your trip.
- Chopsticks are very useful, lightweight and don’t scratch the pot when cooking.
- GSI Pinnacle Soloist Pot.
- Cover.
- Plastic bowl.
- Bag.
- Cooker multi tool.
- Sand stone.
- Titanium Sporke.
- Salt / Pepper.
- Optimus Nova + stove.
- Fire!
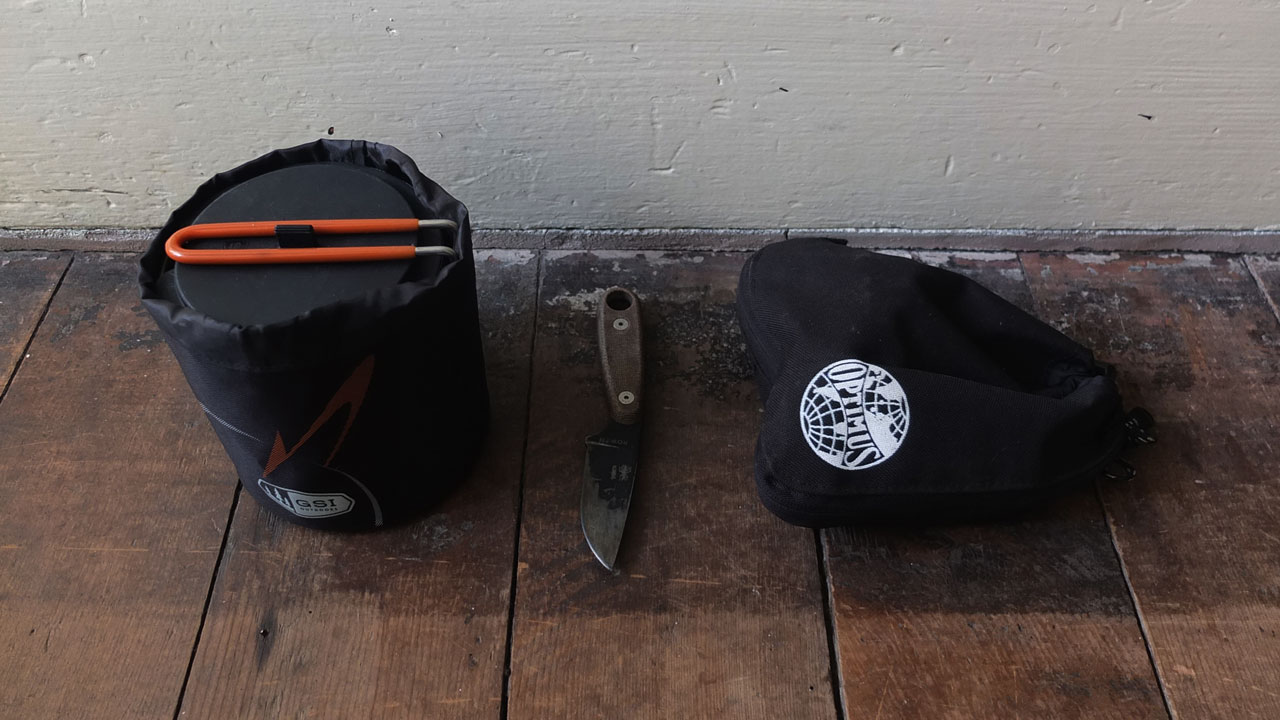
- Bag.
- Gaz stove bag.
- Gaz stove (in case I need to cook inside the tent).
- Esee Knife – Izula (the best).
- And Chopsticks, I’ve forgot them!
Cooking stuff packed
Filtering Water
First Water filter
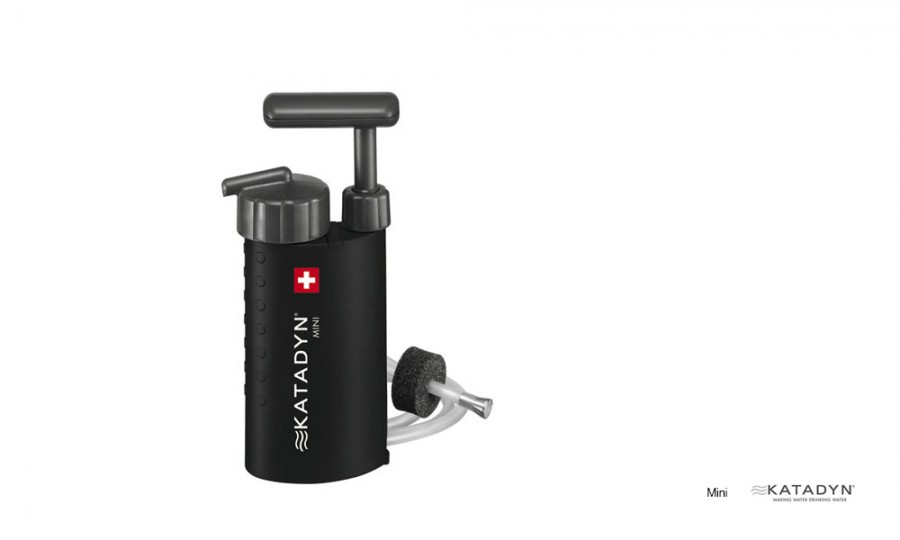
This Katadyn Mini filter helps me to drink safe water from any places. I also don’t have to carry that much water. In New Zealand, I was carrying 5 litres. In Australia, less than 3 litres. But when I will cycle through the desert I will carry 10l. I was able to filtre 7000 litres but the top cap of the filtre broke after 3 years when I’ve filtered only around 500 litres…
Cost: 105€ / Weight : 210g
Second Water filter
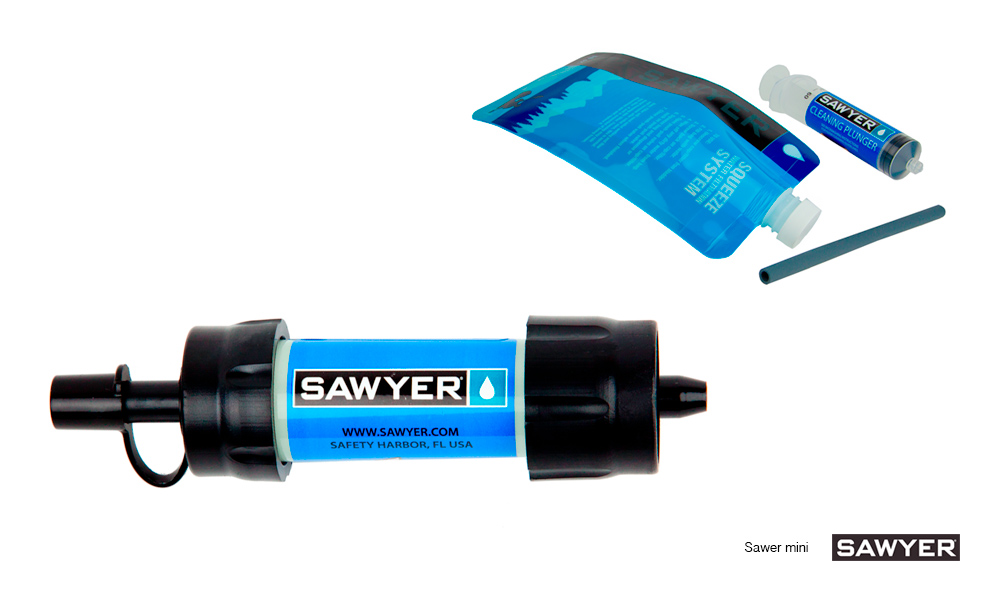
I’ve replaced the Katadyn with this Sawyer Mini filter when I was looking for a replacement ceramic catridge in Malaysia. I cost me less money to buy this sawyer mini when I can filter as much as 100.000 litres! The piece is solid. It should last a looong time. It’s also much lighter and easier to use.
Cost: 134MYR (29euros) / Weight : 57g
Shooting
Canon compact camera
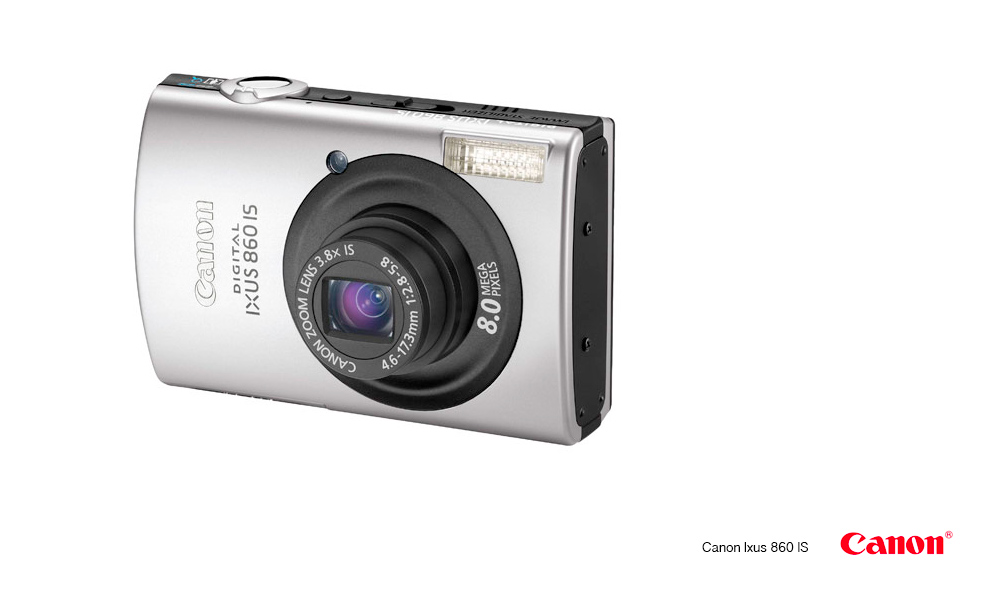
This is the first camera I started with but only three month later I’ve changed it. It was a good one but not in low light.
Cost: 350€ / Weight : ~170g
Fuji compact camera
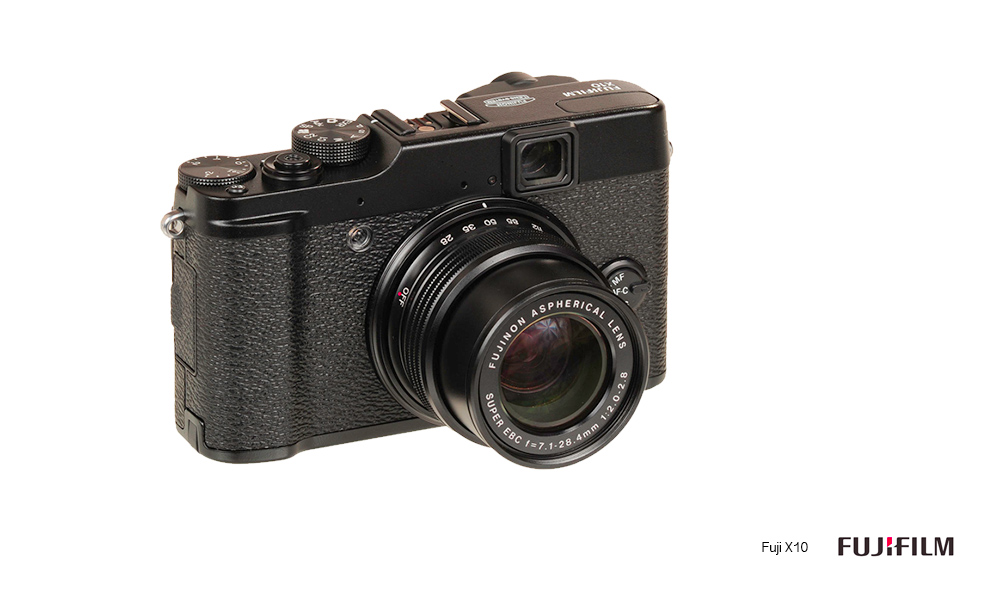
When I came back to Auckland the second time I’ve been in a camera shop only for curiosity. The seller was very good, I came out with a new camera. I thought it would be better to buy a better one now more than at the end of my trip.
Cost: 1000NZD / Weight : ~350g
Other
Mixed stuff
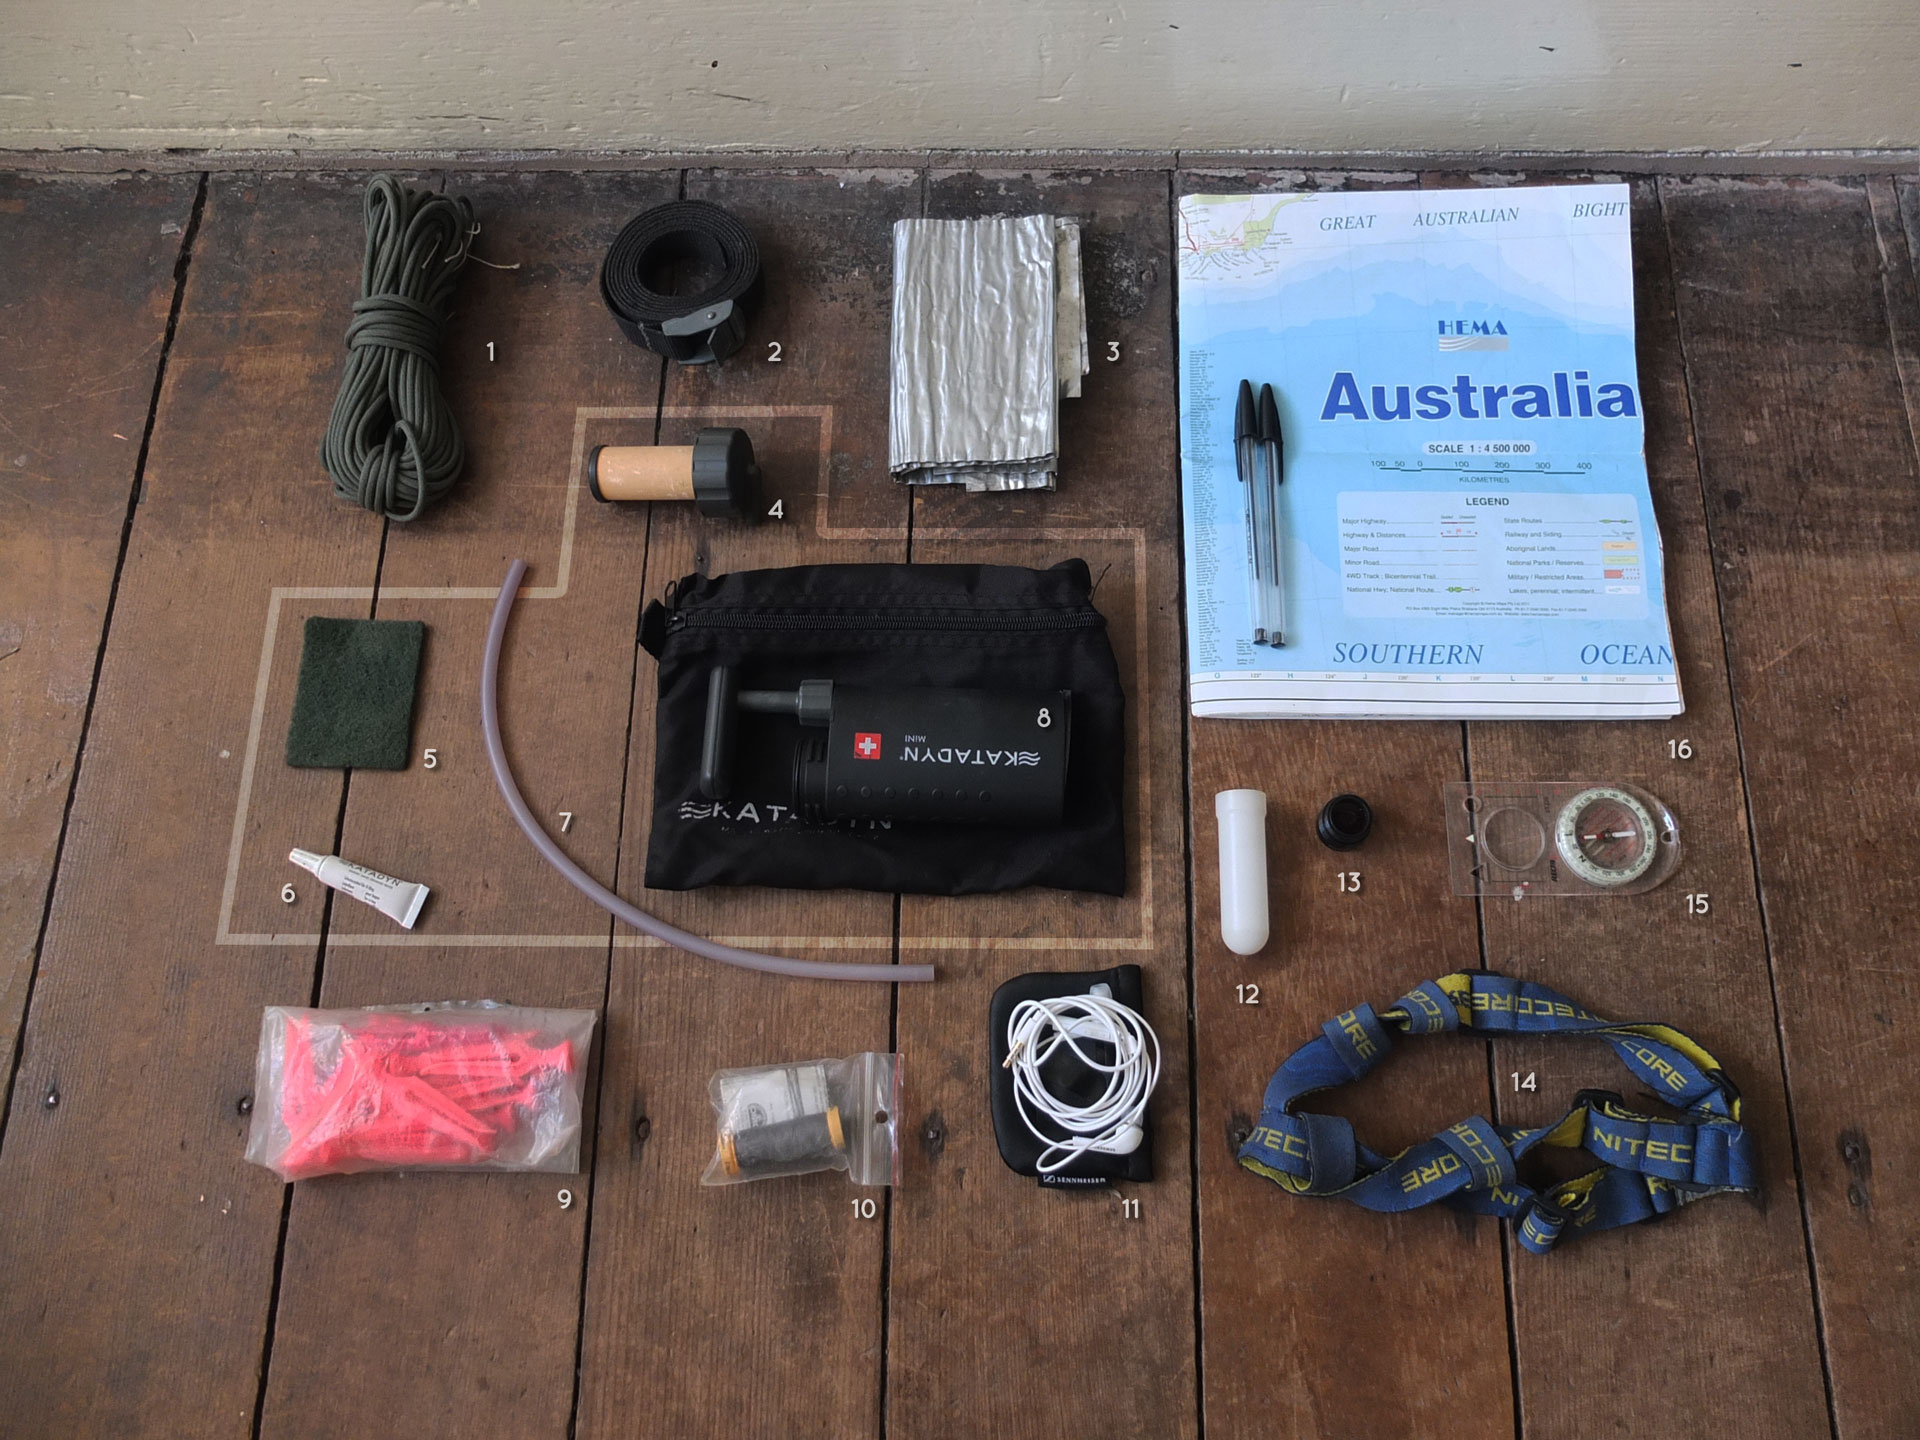
Some various things I’m using more or less frequently during my trip.
- Rope.
- Strap.
- Wind shield.
- Katadyn Ceramic filter.
- Katadyn Cleaning pad.
- Katadyn Lube for rubbers.
- Katadyn Water pipe.
- Katadyn mini (210g / 8oz). Can filter up to 7000l.
- Pegs.
- Needle and thread (very useful).
- Earplugs.
- Torch Light diffuser.
- Torch red filter.
- Torch head strap.
- Compass.
- Map.
Health
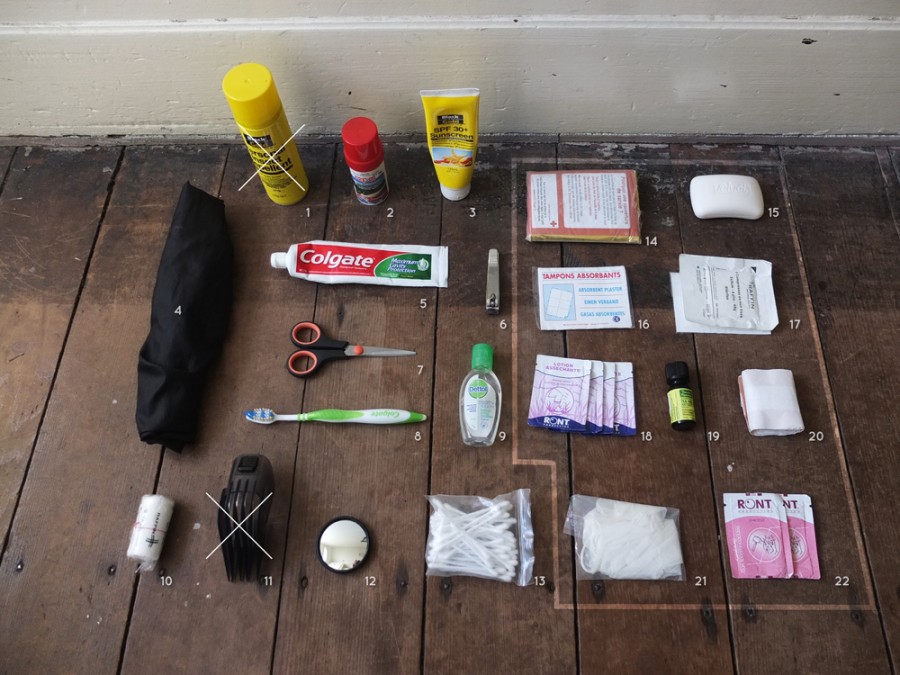
It’s always good to stay as clean as possible when travelling. It’s more enjoyable. Of course, it’s not possible everyday but as long as there is public toilets along the way (in modern countries) it’s quite easy to keep clean.
Mosquito spray (tent).- Mosquito gel (skin).
- Suncream (I prefer to cover myself so I don’t feel greasy if I don’t have a shower at night).
- Bag for my waterproof clothes.
- Toothpaste.
- Nail clipper.
- Scissors.
- Toothbrush.
- Sanitised gel.
- Bandage.
- Shaver’s hair clipper.
- Mirror (again)
- Cotton stalk.
- Survival blanket.
- Soap (for body, hair, dishes, clothes)
- Absorbent pads.
- Don’t know…
- Drying lotion.
- Tea tree oil.
- Bandage
- Gloves.
- Don’t remember
Electronic (certainly too much)
I’m sure I’ve got too much electronic with me (especially since Sydney where I bought a laptop for my work). I’m using everything apart the GoPro. It never has enough battery when I need it! I used to have to chargers for my camera but I bought an USB one so I can charge my camera batteries on the way without freaking out if I can’t take anymore pictures!
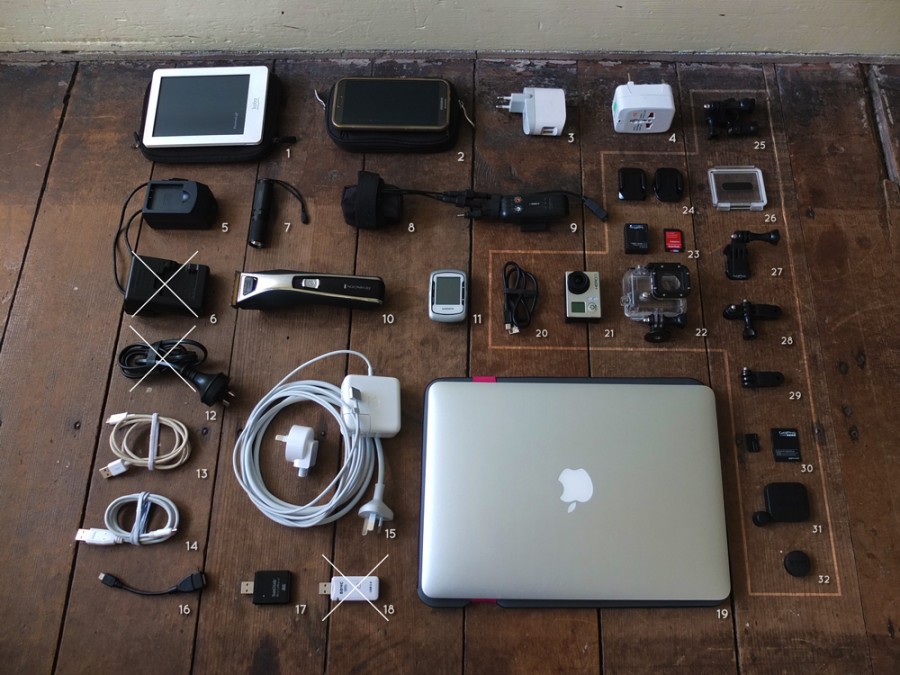
- Kobo Glow.
- Samsung Galaxy Note 2.
- Belkin wall USB charger.
- International plug adaptor.
- Camera USB battery charger.
Camera Wall battery charger.- Torch Nitecore D11.2.
- E-Werk’s buffer battery.
- E-Werk.
- Haircuter / Shaver.
- GPS Garmin Edge 500.
- Cord for camera wall charger.
- Micro USB cord.
- Mini USB cord.
- Apple charger and cord.
- USB OTG cable (to transfert picture on my phone when I don’t have a laptop).
- SDcard reader.
Second SDcard reader (I thought the first one did not work).- Macbook Air 2013.
- Another Micro USB cord.
- GoPro Hero3 Silver.
- GoPro Hero3 case.
- Battery and SDcard 32Go.
Helmet supports.- GoPro stuff.
- Second cap case.
- GoPro fixation.
GoPro fixation.
GoPro fixation.
Spares.- GoPro case cover.
- GoPro lens cover.
Final packed
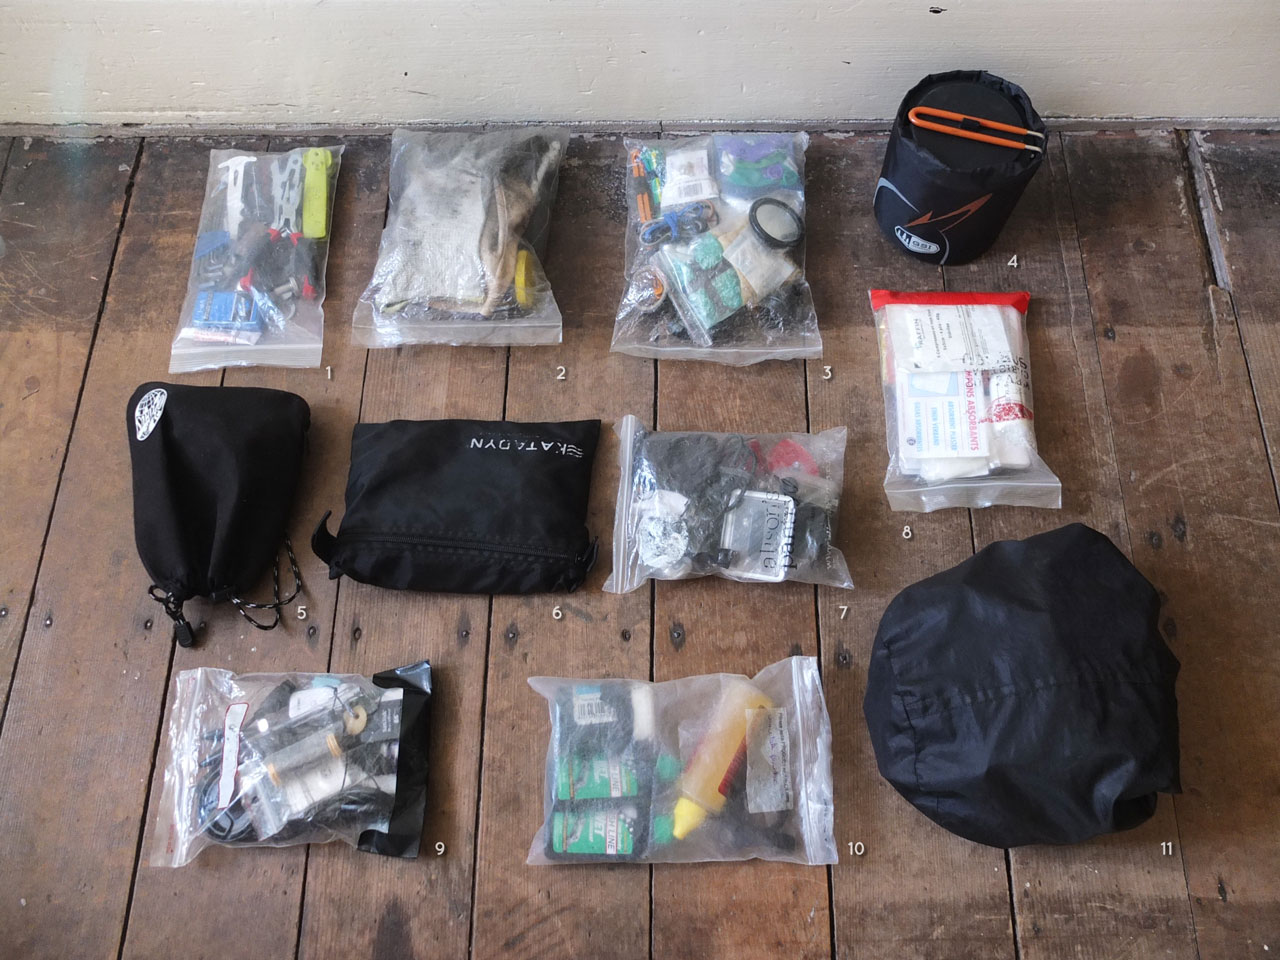
This is it! a plastic bag for every category so it’s waterproof and organized :-)
- Tools.
- Cleaning stuff.
- Spare pieces.
- Pot.
- Stove.
- Katadyn filter.
- Gropro + accessories.
- Health.
- Mixed stuff.
Oiland grease.- Daily Health.
Hi Damien.
What modifications have you made to your gear on the way? Have you changed much from original kit ?
What an organised cute superman!
Cute Superman I don’t know but organised for sure!
Salut Damien, c’est sébastien, ca fait longtemps ! Jerepensais à toi ces derniers temps ! Je vois que tout roule pour toi, j’en suis franchement content ! Qui aurait-cru que tu ne rentrerais jamais ! Tu étais fait pour ça ;) !
Je viens de parcourir un peu ton blog, je connaissais la partie cambodge, dans l’auberge de jeunesse. Et je constate que tu es tjrs au cambodge en tant que graphiste independant ! L’asie a l’air de tavoir bien plus on dirait !
J’ai également parcouru la partie matériel et j’aurais une question concernant deux choses :
– la courroie gates
– le moyeu son
Concernant la courroie, je suis entrain de monter un nouveau vélo avec un moyeu rohloff, et je me demandais la fiabilité de la courroie sur pistes…Est-ce qu’elle couine avec le sable ? Est-ce que ca fait du bruit ? Est-ce que ca se detend bcp ? Gates a deux modèles maintenant si jai bien compris, dont un moins plus adapté aux conditions difficiles…J’ai une pratique voyage plus orientée piste maintenant que routes (trop de frayeurs aux canada et aux etats unis…).
Est-ce que c’est vraiment plus agreable qu’une chaine ? Déjà ca a bcp moins d’inconvenients au niveau entretien.
J’aimerais bien avoir ton retour ;) !
au plaisir de te lire !
Oupss j’ai oublié la question sur le son 28 !
Toi qui l’utilise fréquemment, à partir de quelle vitesse, il commence vraiment à charger ?
Merci ;) !